February 06, 2016

1890s Cape

I've been working on some commissions recently including an 1890s cape in a lovely green wool with a walking skirt in the same fabric to match. I don't have any pics of the skirt but thought I'd do a quick post of the cape.

I used the Truly Victorian cape pattern as a base but lengthened it by about three inches. I interlined it with batting for warmth and made a flat collar in black velvet instead of the standing collar. The front is closed with three frogs I made out of black braided cord.

It should be snuggly warm for our visit to Coopershill this year! 


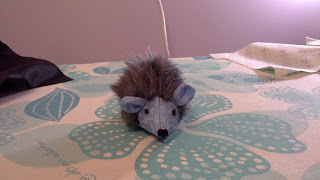
A Hedge Pig!

I made this little guy as a quick Christmas gift using this tutorial. I think he's really cute! 


November 30, 2015

My Red Dwarf Regency Dress

A little while ago I picked up some spotted voile at a good discount as there was a lot of water damage to the roll. After washing it I reckoned I could work around the discoloured patches that were left and use it to try out the Laughing Moon bib front dress pattern.

I chose the full gathered front and short sleeves. It's very close fitting, I think I'll use the next size up for the next dress, but overall I'm pleased with the result! I'm calling it my Red Dwarf Regency dress because I went through several series of it on in the background while making it and think I'll now forever connect the two! :)


The underbodice closes with three ties. Then the bodice front is secured over it with straight pins or a few stitches.


My plan is to wear this on one of the evenings of our annual Coopershill Historical House Party so that I can have triple helpings of all the lovely food with no corset to get in the way!


Only the bodice is lined and I'm wearing it over my tucked bodiced petticoat. I'm being very naughty and not wearing a shift as I need to make a new one that doesn't have enormous sleeves.


The traditional fashion plate wedgie pose


November 01, 2015

A Quilt For A Baby Girl

A dear cousin had her first baby recently, a little girl, and as everyone I'm close to has to suffer my homemade presents I decided to make her a quilt!

Although I've done a little quilting on various things in the past this is the first proper quilt I've made.
There is a lovely local quilting shop, Apple Tree Crafts, with delicious fabrics, going there is like going into a sweet shop! The staff are so nice, they even make you cups of tea to have while you browse! They gave me great advice and I came home with some lovely fabrics. The batting I used was bamboo.


I found a lovely hour-glass pattern and tutorial online here and originally as it was for a girl I was thinking of something similar colour-wise in pinks but in the end was drawn to far more gender neutral fabrics and I actually prefer that really. Who says you have to have pink for girls! And this way it will do for any future babies too.


The finished quilt!

I was a bit worried that some of the fabrics weren't densely enough coloured or patterned, the owl one really, as when paired with the white it got a bit lost. Plus the colours seemed rather dull for a baby when put together, but with the blue border and backing I think it came together well in the end and I'm really pleased with it!


I really enjoyed making this and can see how quilting can become addictive! I will definitely be making more in the future! :)


August 01, 2015

A Quilted Sun Bonnet

I enjoyed making my last bonnet so much I thought I'd make another, this time a Victorian sun bonnet using Romantic History's wonderful tutorial. It was super quick to make and very easy.  A nice project for a wet summer afternoon with the hope of better weather to come! 


The brim is quilted in a diamond design and the edges are piped. The brim can be folded back out of the way when you need to see a little bit more around you. I'd quite like to make another in a sheer fabric and cord the brim instead.


July 13, 2015

A Regency Close Bonnet

HSF Challenge #7: Accessorise

One day last week I felt like putting on some radio comedy, eating chocolate and making something pretty! It had to be something easy, relaxing and that wouldn't tax my brain too much. A hat fit the bill and I pulled up the YWU tutorial for a Regency close bonnet. After it was made I realised that it fit perfectly into the July HSF challenge! Yeay!

I wanted to make something along the lines of these bonnets...


Not so much like these...


I followed the tutorial pretty closely, only shortening the brim by about an inch and a half though on reflection I might have left it the original length. What at first seems a ridiculous length of brim is considerably shortened when you add in things like hairstyles.


The brim is one layer of buckram (a bit of an experiment as I usually double up on the buckram) wired on all sides and the soft crown is just two layers of cotton lawn. I quilted the brim with two layers of curtain interlining and used narrow ribbon to mark the quilting lines. The inside of the brim has another layer of interlining and a cotton lining on top of that.

I had bought lots of paper flowers in different colours when I was visiting my sister in Bakewell and I used a purple bunch for the bonnet.

All in all it worked out pretty well though I messed the crown up a bit, the lining inside is a bit tight and I somehow managed to sew it on sort of off-set and not centered. Trying to compensate for that by making little tucks only exacerbated the too tightness of it that the lining was already doing! I don't think it mattered too much in the end though.


You do have a kind of tunnel vision effect when wearing it and I can hear my voice echoing when I talk which is kind of novel! Also realised that currently the only Regency day dress I have is kind of orangey/red... Not the best match for a purplely/lilac bonnet! But there is lovely cream linen just waiting to be made into a day dress sometime soon that will go nicely.

Looking at an enormous spider on the wall!


What the item is: A close bonnet c.1810

The Challenge: Accessorise

Fabric: Buckram, cotton lawn, curtain interlining,

Pattern: YWU Tutorial

Year: c. 1810

Notions: polysatin ribbon, paper flowers

How historically accurate is it? Hmmm the pattern is accurate and it's mostly hand sewn but the fabrics include synthetics so I'd guess maybe 75% historically accurate

Hours to complete: Made it over several days, picking it up for an hour or two at a time.

First worn: Yet to be worn!

Total cost: All stash items except the ribbon so about €10

June 03, 2015

A Corded Petticoat

So I'm only now really getting back my own sewing mojo after a prolonged period of commercial sewing and other stresses. The feeling of sewing for pleasure again, with no deadline or pressure is rather nice! But kind of slow going so I apologise for the lack of posts :)

I ended up picking up a project that I had gathered the materials for about four years ago and then left in a bag at the bottom of a box, a corded petticoat.


I've been thinking of making a late 1820s / early 1830s dress with some yummy gold silk that I have so I made this corded petticoat with that silhouette in mind. I'm pretty sure though that it will be useful for lots of eras!

I used cotton sheeting and had a whole roll of cotton piping cord, about 1/4" thick, and ended up pre-washing both, just in case. For the cord I took it off the roll and dunked it into a sink of hot water and left it there for a while crossing my fingers that it wouldn't get too tangled between washing and drying!

I did a bit of research and it seemed that corded petticoats were most successful when not too full so I decided on an 86" circumference for my petticoat. There are a few ways of making a corded petticoat but what I went with was to sew up my panels completely into the skirt and then corded it. If you leave one seam undone, cord it flat and then sew that final seam up it can cause it to dip in a funny way.

I made the petticoat about 20" longer than I needed and then simply folded the extra up, put the first row of piping cord in that fold and then each subsequent row was sewn between the two layers.


It takes longer than you think, even with a piping foot! I didn't go too far up as it was a 20s/30s look I was going for but when I make one for an 1840s impression I'll go right the way up close to the waist.


It gives quite a nice effect, not too pronounced but definitely adds volume where it's needed! So that's it, just a nice simple petticoat :)